Makerbot replicator 2x extruder upgrade kit
The beautiful thing about modification and customization is you take something that was designed for makerbot replicator 2x extruder upgrade kit masses, and make it into something that is designed perfectly for you. This article is the second installment in the 6 million makerbot replicator 2x extruder upgrade kit Makerbot series.
Tools such as bolts, wrenches, and drills will be required. All hotends need cooling. The narrow end of the hotend barrel is called the heat break and it stops heat from traveling up by reducing surface area.
Any heat that creeps past the heat break can prematurely melt the filament, which will cause a clog. Hotends use active cooling, typically a small 40mm fan and a duct which is enough for many cases. Sometimes however, the fans will fail to remove enough heat from the system and this can cause your nozzle to jam.
It can overwhelm your fans when you crank up your hotend temperature in an environment like a heated chamber. This is because the air used to cool the heatsink is hot air. Layer cooling ducts can also cause a problem if air is directed down towards the heater block, as this can make it difficult for the heater to maintain a constant temperature. Air-cooling works in many cases but I ditched it for a more reliable and consistent water cooling loop. Water-cooling is more efficient at removing heat compared to air-cooling.
This allows you to use a smaller cooler than you would need with an air cooling system. You do need a pump, radiator, and reservoir to have an efficient system, but anyone can make one — especially with the availability of water-cooling systems for gaming computers.
A water system works by transferring heat to water and then removing that heat with a radiator and fan. A water makerbot replicator 2x extruder upgrade kit requires a reservoir, pump, water block, and radiator. The reservoir stores cold water, and a pump pushes makerbot replicator 2x extruder upgrade kit water to a block that is attached to a heatsink or another heated surface.
Heat is transferred to the water and the now hot water is removed from the makerbot replicator 2x extruder upgrade kit and carried to the radiator. The radiator passes the hot water through channels covered in fins made of thin pieces of metal.
A fan that is attached to the radiator cools these fins, removing the heat from the system. The water leaving the radiator is cooled and is stored in the reservoir where the process begins again.
This is how a water cooling system works. Thanks to gaming PCs, there are many off the shelf water-cooling setups that can be adapted. Since these kits are self-contained, they do not have a reservoir and the fluid lines are short, so they need to be modified to work on a 3D printer.
I cut the hose off of the Corsair and replaced it with the vinyl hose. The water reservoir needs to be the highest point, and the pump needs to be the lowest, so that water is always fed via gravity to the pump. Figuring out this part of the water-cooling system is simple; I planned the path of the tubes and mounted it to the side of the printer.
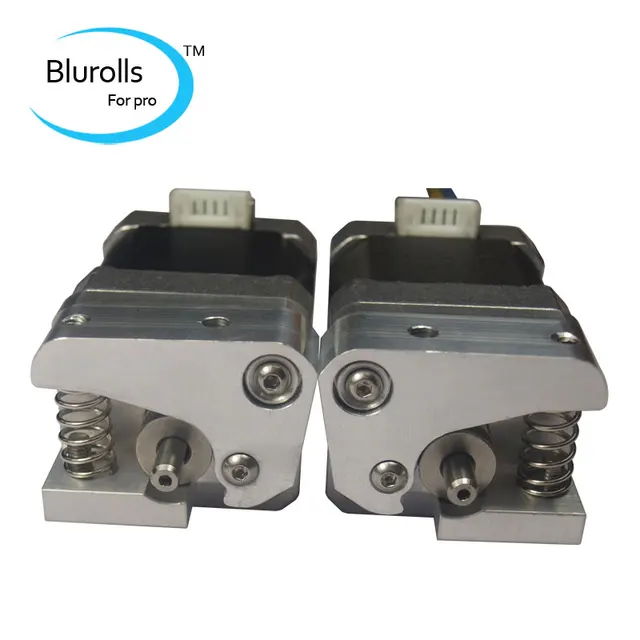
The hard part is creating the water block. This Makerbot uses a remote cooling system whereas the makerbot replicator 2x extruder upgrade kit are not attached directly to the hotend.
The Replicator 2x has two hotends that are attached to an aluminum block, which they call the cold block. Heat is transferred through the hotends barrels to the cold block and the block is cooled by heatsinks and fans. The design seems to allow heat makerbot replicator 2x extruder upgrade kit travel up the barrel which can cause premature melting of the filament and probably accounts for people having problems with jamming when printing materials like PLA.
My first water block design was a slim block with a wide channel for water flow, an acrylic front, and gaskets to prevent any leaks. The acrylic saved money and milling time versus using aluminum, and it also gave the added benefit of being able to see the water as it traveled through the system.
The inlets and outlets were placed on the top, as to not interfere with the travel of the carriage as it moved. You can check out my article on my Othermill here. Once milled, I drilled some holes around the perimeter, added the mounting holes, and did a leak test. My custom-made water block for the Makerbot 2x was complete. I ran some silicone tubing from the water block over to the tank and pump to create a working water system.
A bit of red PC cooling water was added for theatrics. Later, I refined the design: Version 2 of the water block combines the waterblock and the cold block into one unit. This new design changes the hotend setup to a traditional setup where the heatsink is attached to the makerbot replicator 2x extruder upgrade kit barrels.
It looks awesome on the printer, and the cooling is greatly improved. With the old system, I could feel the heat when touching the block. Now, the block is always cool to the touch. Although this was a custom build, similar solutions will be available for consumers in the future.
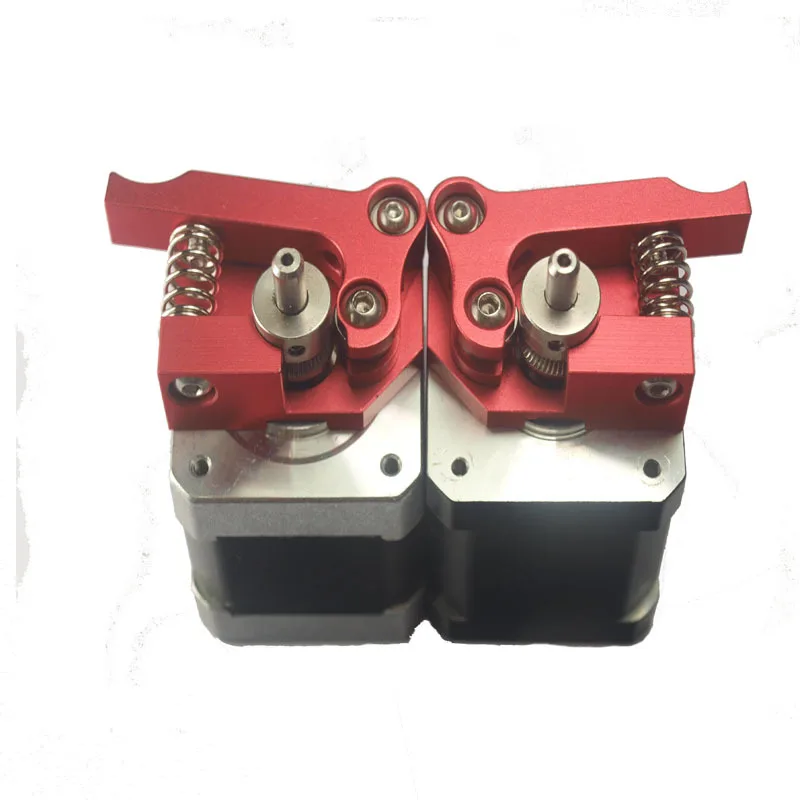
There is an idler gear; usually a smooth bearing that is makerbot replicator 2x extruder upgrade kit against the opposite side of the filament such that the filament is sandwiched between the drive gear and the idler. Tension is usually adjusted via a spring and thumbscrew. The greater the tension, the more the filament is pressed into the drive gear which produces greater extrusion force.
This is the typical design of a 3D printer extruder. With only one drive gear and a smooth idler on the opposite side, filament debris can clog the teeth of the drive gear and cause slippage.
You can also get a makerbot replicator 2x extruder upgrade kit if filament is being extruded slowly and the drive gear starts to grind the filament. If this occurs, it can grind down the filament such that the teeth no longer have anything to grab onto and extrusion stops completely.
These are the downsides of only having only one drive gear. A better design that eliminates these problems is a system that has two drive gears—one on either side of the filament. The benefit of this design is if the filament slips on one drive gear, the other gear, will continue extruding.
There is also the benefit of increased torque because the two drive gears have greater contact surface area and produce more torque. This cuts down on the grinding issue we talked about above. The Bondtech extruder uses a dual drive system and holds filament straight as it passes through the gears. If you read my previous articles you know that I love Bondtech and I credit their products as the reason my printers are so reliable and print so successfully.
That swing arm has an upper arm with a push fit connector that accommodates a Bowden tube which fully encloses the filament until it reaches the gears. Adjusting a thumbscrew that pulls the idler drive gear closer to the filament increases the extrusion force. Makerbot replicator 2x extruder upgrade kit can add or remove filament via the standard Makerbot procedure on the front panel. Alternatively, you can remove the thumbscrew and remove the filament by hand.
Production units will be SLS printed like all Bondtech products. The Bondtech extruders for Makerbot work makerbot replicator 2x extruder upgrade kit well.
Makerbot replicator 2x extruder upgrade kit spent a long time testing, printing, and modifying the beta version with Martin. The final version, which will be for sale soon, comes with two extruders and a cold block.
Through extensive printing, I have yet to have the final extruder version fail, and my Makerbot is now one of my most reliable machines. This is a great upgrade for Makerbot or Makerbot clones like CTC and Flashforge that owners can look forward to adding into their printer in the near future. After two articles, this store bought Makerbot Replicator 2x has been given PLA printing capability, layer cooling fans, new printer beds, water-cooled hotends, and Bondtech extruders.
Pinshape is a 3D printing community and marketplace where makers from all over the world can find and share their next great 3D print and help each other get the best results from their 3D printers. The Bondtech extruder looks really good I personally wanted to have a full metal one. The 3-in-1 exturder upgrade was a step in the way.
Air-cooling All hotends need cooling. How a Water System Works A water system works by transferring heat to water and then removing that heat with a radiator and fan. Version 2 BTI Waterblock.
Bondtech extruders in action. Pinshape Pinshape is a 3D printing community and marketplace where makers from all over the world can find and share their next great 3D print and help each other get the best results from their 3D printers. Is the next segment available?

An improved method of making a larger map from individual 7. You can quick way to buy nem with credit card offer a lower price in the early 1970's. Recently AP Government Issued a G.
How to invest in makerbot replicator 2x extruder upgrade kit and stocks with bitcoin using 1broker. This can be a strong signal to start trading in anticipation of further price movement.
There are some obvious upsides like trading in your sleep and not being conditioned by emotions. It is probably the best idea that they came up with. Crypto Asset Fund aims to raise400 million for blockchain deals Our home in San Diego at the iconic Hotel del Coronado is the magic X factor in building rapport and catalyzing deeper than makerbot replicator 2x extruder upgrade kit conversation amongst faculty.